

R.V. SINGLE WIRELESS AIR BED CONTROL
OPERATING INSTRUCTIONS
Please Be Sure To View or Read All Instructions Before Operating
To Make Sure You Get Optimal Use From Your RV Single Control Air Bed, Please See Below:
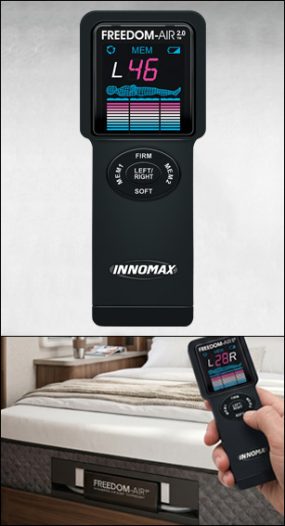
The INNOMAX® Freedom-Air 2.0™ In-Rail Inflator with Wireless Remote Control is designed to adjust variable support in the air chamber system to provide personal contouring so you or your partner can regulate your own individual comfort.
Featuring the latest Smart Support Technology™ (SST) for continuous comfort. The Freedom-Air 2.0 is easy to operate and includes minimal power consumption and low noise for the best rest of your life. The remote control adjusts both sides of the air mattress.
Video Duration: 8 min 40 sec. | Instructions: 0:00 – 5:40 | Troubleshooting Tips: 5:40 – 8:40
Technical Data:
Adjustable Inflation: Up to 50 Voltage: DC12V Operating Power: 15.3W Standby Power: 0.71W
Adjustable Inflation: Up to 50 Voltage: DC12V Operating Power: 15.3W Standby Power: 0.71W
OPERATING INSTRUCTIONS
1. Plug in the pump. Plug in the pump, the power indicator will flash slowly for 30 seconds and then stops flashing which means the system is in standby mode. The power indicator will flash when the pump is working. (If remote shows “Er” see “Troubleshooting” section).
2. Press any button to light LCD for operation. If there is no operation after 15 seconds LCD will turn off automatically to save battery life.
3. Pressing LEFT/RIGHT button: Press “LEFT/RIGHT” button to select left side or right side air chamber for further operation. LCD will show “L” or “R” accordingly.
4. Inflation or Deflation – FIRM: Press “FIRM” button one time, the pump will be activated to inflate and the pressure level shown on LCD will increase relative to pressure in air chamber, and scroll bar will scroll up to show that the pressure is increasing. At any time during the period of inflation, pressing any button will stop the inflation. Or when the pressure reaches the maximum “50” on LCD, the inflation will stop automatically.
5. Inflation or Deflation – SOFT: Press “SOFT” button, the pump will be activated to deflate and the pressure level shown on LCD will decrease relative to pressure in air chamber, and scroll bar will scroll down to show that the pressure is decreasing. At any time during the period of deflation, pressing any button will stop the deflation. Or when the pressure reaches the minimum “0” on LCD, the deflation will stop automatically.
6. “MEM” Memory: Press “MEM1” or “MEM2” button, LCD will show “M1” or “M2” and the pump will be activated to inflate or deflate until the pressure in air chamber reaches the level memorized. When the pump is inflating or deflating to the level memorized, pressing any button will still stop inflation or deflation.
7. Setting Memory Level: When LCD shows a pressure level readout, before or after inflation or deflation, press and hold “MEM1” or “MEM2” button for 3 seconds, M1 or M2 indicator will flash and the current pressure level will be kept as a new memory level. The memory level for left or right side air chamber can be set in the same way, to be same or different. The default MEM1 level is 25mmHg (“25” on LCD). The default MEM2 level is 20 mmHg (“20” on LCD)..
8. Smart Support Technology (SST): SST is enabled by default to maintain level last selected or memory setting for continuous comfort. SST may be
disabled/enabled by pressing “LEFT/RIGHT” for 3 seconds then, while still pressing “LEFT/RIGHT” button, quickly press “FIRM” button at which time LCD will display F1, at this time pressing “LEFT/RIGHT” will turn SST off or on. When disabled SST symbol will not show in the LCD display.
disabled/enabled by pressing “LEFT/RIGHT” for 3 seconds then, while still pressing “LEFT/RIGHT” button, quickly press “FIRM” button at which time LCD will display F1, at this time pressing “LEFT/RIGHT” will turn SST off or on. When disabled SST symbol will not show in the LCD display.
TROUBLESHOOTING TIPS
1. Buttons: On startup, buttons may need to be pushed more than once as inflator calibrates to sleep system.
2. Range: wireless remote control range is 15 to 30 ft (5-10cm), so if out of range controller will show “Er”.
3. Sync: While remote is synced before delivery, if “Er” continues to show on LCD please re-sync. To re-sync, disconnect power to the pump, then power it on again. Within 30 seconds while power indicator is flashing, press any button to light LCD, then pressing “FIRM” button for 3 seconds will start the re-sync. LCD will display “SU” when the pump and remote are synced again successfully and enter the standby mode. If remote does not sync after a few attempts, remove batteries for one minute and after replacing try the sync process again.
4. Batteries: The remote is powered by three AAA batteries. LCD will show low battery capacity alert when it is time to replace the batteries. Please remove batteries if the inflator will not be in use for a long period of time.
5. The Digital Readout On Hand Control will vary: depending on many external factors such as temperature changes, exposure to direct sunlight & temperature changes with or without sleeper.
6. Readings May Vary When Lying In Different Positions: ie: laying on your side versus your back or stomach.
7. Digital Readout Will Fluctuate During Inflation and/or Deflation: Once the button is released, briefly touch button once and the control & inflator will synchronize. The reading will then reflect the realtime pressure setting.
8. Readouts Will Differ When Somebody Is On Bed vs Not On Bed:
Check readout at night & again the next morning while lying in bed for at least 2 nights without making any changes to the sleeping conditions to verify a significant change in readout. If a significant number difference (such as 10) is noticed under consistent circumstances, contact authorized dealer for replacement or online at:
Claim Form: www.innomax.com/warranty-claim-form.
Phone: 1-800-InnoMax (466-6629).
DOWNLOAD INSTRUCTIONS

CLICK TO DOWNLOAD
RV Single Wireless Air Bed Control Operating Instructions